Browse Tag by No-Bake
No-Bake

Caramel Peanut Butter Halloween Monster Munch

Caramel Peanut Butter Halloween Monster Munch is a quick, tasty, and festive little treat. It is a combination of pretzels, popcorn, Reese’s Pieces, and candy corn, all coated in a smooth caramel-y peanut butter mixture. It is a cinch to throw together and would be perfect for any Halloween gathering. 

Let’s talk Halloween-I absolutely love it. Even as an adult, it still continues to rank high on the charts as one of my favorite holidays. As of last year, My sister-in-law, The Rancher’s Wife, and I started the tradition of spending an evening together to make Halloween goodies to enjoy, while the two of us and our crew watch Hocus Pocus- which just happens to be my favorite Halloween movie. We think it’s a pretty rad way to spend an October evening 🙂

Caramel Peanut Butter Halloween Monster Munch from butterloveandcowboys.com

As I contemplated what new treat to try last Friday for our movie night, I thought about all these Halloween party mixes I have seen and decided to come up with my own version. That’s how this fun Halloween Monster Munch was born. I will make a note that when I initially made it, I didn’t put any salt in and we decided it needed it to make it more of a sweet and salty treat, as opposed to just sweet. I have modified the recipe below for you. 

Caramel Peanut Butter Halloween Monster Munch from butterloveandcowboys.com

Caramel Peanut Butter Halloween Monster Munch from butterloveandcowboys.com

Caramel Peanut Butter Halloween Monster Munch from butterloveandcowboys.com

Halloween Monster Munch is great addition to any movie, but I will say that it paired really well with Hocus Pocus :D-Happy Halloween! 

Caramel Peanut Butter Halloween Monster Munch
A tasty and festive Halloween snack mix, covered in a smooth caramel and peanut butter mixture
Write a review
Print
Ingredients
  1. 1 cup corn syrup
  2. 2 cups brown sugar
  3. 1 can sweetened condensed milk
  4. 1 cup peanut butter
  5. 1/2 teaspoon salt (add more or less to taste)
  6. 1 teaspoon vanilla
  7. 12 cups popped popcorn
  8. 5 cups pretzels (can be mini pretzels or pretzel sticks)
  9. 3 (4 oz) boxes Reese's Pieces
  10. 1 cup candy corn
  11. 1 cup peanuts or almonds (optional)
Instructions
  1. Mix the corn syrup and brown sugar in a medium size saucepan and bring to a boil. Boil for one minute and remove from heat. Add the sweetened condensed milk, peanut butter, salt, and vanilla. Stir until smooth and the peanut butter is melted and incorporated into the mixture. In a large bowl, combine the popped popcorn, pretzels, Reese's Pieces, candy corn, and nuts (if using). Pour the caramel and peanut butter mixture over the top, mix until all ingredients are evenly coated. Serve and enjoy! Store leftovers in an air tight container or Ziploc bags.
Butter, Love, and Cowboys https://www.butterloveandcowboys.com/
No-Bake

Hot Fudge Sauce

I love ice cream and I love Hot Fudge Sauce. Hot Fudge and I are basically two peas in a pod. Especially when it is dripping down a bowl full of three or four big ol’ scoops of vanilla ice cream. I’m not a big fan of vanilla ice cream plain. I love it on top of a brownie or cobbler, but I’d much rather have something with a chocolate or even a fruity base if I’m eating it plain. Does it surprise you that my number one pick is any flavor that has both chocolate and peanut butter? However, I adore vanilla ice cream when it is dripping with Hot Fudge. It’s even better if there is a brownie on the bottom!

This has been my go-to Hot Fudge Sauce for years. My mom stumbled upon this recipe when I was a young teen and I’ve been making it ever since. It is super simple and can be ready to serve nice and quick-like. 

Hot Fudge Sauce from butterloveandcowboys.com

This recipe is the perfect consistency. I like a fairly thick sauce for ice cream. I would rather it be too thick than too thin. This version is thick enough it stick s a bit to the ice cream but thin enough it doesn’t harden once it’s placed on top of it.

There are a few Hot Fudge recipes in my arsenal. My Cowboy and I love them all. We rotate through each of them, but I always have a special place in my belly for this one. I would say I’ve always been a Hot Fudge addict, but this past year or so, I have not been restricting my intake to just ice cream. I’ve been eating it on brownies, cheesecake, fruit and anything else that I think it can possibly go with. And for whatever treat I don’t think Hot Fudge pairs well with, I use this caramel sauce.

Whoever came up with the idea that a little Hot Fudge Sauce goes a long way didn’t love it nearly as much as I do.

I have drenching problems.

Hot Fudge Sauce from butterloveandcowboys.com

Hot Fudge Sauce from butterloveandcowboys.com

Hot Fudge Sauce from butterloveandcowboys.com

For this sauce, I use 2/3 milk chocolate and 1/3 dark chocolate. I’m not a fan of dark chocolate alone, I much prefer the sweetness of milk chocolate. I love rich flavors though. So in order to get the sweetness of milk chocolate with the richness of dark chocolate, I pair the two together, with a higher ratio of milk chocolate. If you are a dark chocolate lover, go ahead and use as much dark as you like!

Now go on and drench your ice cream with this delicious sauce!

Hot Fudge Sauce
A quick and easy Hot Fudge Sauce that pairs perfectly with ice cream, but can be used for any treat you'd like to drench with chocolate!
Write a review
Print
Ingredients
  1. 1 14 oz can sweetened, condensed milk
  2. 2/3 cup milk chocolate chips
  3. 1/3 cup dark chocolate chips
  4. 4 tablespoons butter
  5. 1 teaspoon vanilla
  6. 2 tablespoons heavy cream (optional)
Instructions
  1. Place sweetened condensed milk, milk chocolate chips, dark chocolate chips, butter, and vanilla in a small saucepan over medium-low heat. Stir occasionally until melted. Don't let it scorch! Finish melting in any chocolate clumps by whisking. Add cream, if desired, for consistency. Add more if you want to thin out the sauce. Serve over ice cream or brownies. Refrigerate leftovers.
Notes
  1. Use any ratio of dark or milk chocolate chips you like! I prefer the flavor of milk chocolate with a little richness from the dark chocolate, so I add the dark chocolate chips. Sometimes I do 3/4 cup milk chocolate to 1/4 cup dark chocolate. Use what you prefer.
Butter, Love, and Cowboys https://www.butterloveandcowboys.com/
No-Bake

Raspberry Golden Oreo Dessert

Raspberry Golden Oreo Dessert is a combination of some wonderful things. Remember Heavenly Oreo Dessert? It is a spin-off of that delightful recipe. It starts out with a Golden Oreo crust, followed by the traditional sweetened cream cheese layer. On top of that we place a raspberry filling. For that filling, I used one in a half batches of my Raspberry Sauce recipe. Lastly, Cool Whip and extra Golden Oreo crumbs topped it off nicely. 

I have been wanting to do some fruity experimenting with the original Heavenly Oreo Dessert recipe for a while and knew I wanted to do a raspberry version. Raspberry Golden Oreo Dessert was born and was definitely a success! My sisters and their families were staying with us when we had it around. My 12-year-old nephew raved about it. He insisted that I give his mom the recipe and requested I make it again while they were at our house. Honestly, our summer has been so busy I never did either but now it will be easily accessible for all. 

Raspberry Golden Oreo Dessert from butterloveandcowboys.com

Said nephew, the one who loved Raspberry Golden Oreo Dessert is such a crack-up. I started laughing at him when he was about eighteen months old and haven’t stopped since. One evening, in Montana, he, another nine year old nephew of mine, and myself had each other laughing so hard our sides hurt and I was in tears. I accidentally kept getting those boys in trouble for being too loud. But they are just so darn funny.

Golly we have had fun this summer.

With my sisters visiting and a couple extended trips to Montana, we have had such a busy July and August, thus the lack of posts this past two months. I wrote a bit about my first Montana trip already and we have since added another to the list.

Raspberry Golden Oreo Dessert from butterloveandcowboys.com

Raspberry Golden Oreo Dessert from butterloveandcowboys.com

Raspberry Golden Oreo Dessert from butterloveandcowboys.com

Raspberry Golden Oreo Dessert from butterloveandcowboys.com

Raspberry Golden Oreo Dessert from butterloveandcowboys.com

Raspberry Golden Oreo Dessert from butterloveandcowboys.com

Raspberry Golden Oreo Dessert from butterloveandcowboys.com

Any who, Raspberry Golden Oreo Dessert is calling your name. Summer is nearing it’s end for the year, but this is a summer dessert you won’t want to miss out on!

Raspberry Golden Oreo Dessert
Raspberry Golden Oreo Dessert is a fruity and creamy no-bake dessert that will be a crowd favorite.
Write a review
Print
Ingredients
  1. 1 package Golden Oreo's
  2. 1/2 cup butter, melted
  3. 8 oz cream cheese, soft
  4. 1 cup powdered sugar
  5. 2 (8 oz each) containers Cool Whip
  6. 3 tablespoons cornstarch, mixed with 3 tablespoons cold water
  7. 3 cups fresh OR frozen raspberries
  8. 3/4 cup water
  9. 1 1/4 cup sugar
  10. 3 tablespoons lemon juice
  11. 1 teaspoon vanilla
Instructions
  1. 1. Crush the Golden Oreo's into small chunks with a food processor OR a Ziploc bag and rolling pin. Reserve 1/2 cup of the crumbs for topping. Combine Golden Oreo's and melted butter in a 9x13 inch pan. Press into pan.
  2. 2. Beat the softened cream cheese until smooth. Mix in powdered sugar. Fold in 1 (8 oz) container of Cool Whip with a spatula. Spread over Oreo crust. Place in the fridge for now.
  3. 3. For the raspberry filling, whisk the cornstarch and cold water together. In a large saucepan place the raspberries, water, sugar, and lemon juice. Stir frequently as you bring the mixture to a low boil over medium heat. Gradually stir in the cornstarch/water mixture.
  4. 4. Simmer, covered for about seven minutes or until desired thickness is reached. Stir occasionally. Add vanilla and remove from the heat. Place pan of raspberry filling in the freezer for twenty minutes to cool quickly.
  5. 5. Once filling has cooled a while, remove the 9x13 pan from the fridge, and pour filling over the cream cheese layer. Top with the second container of Cool Whip and garnish with reserved 1/2 cup of Oreo crumbs.Refrigerate 1-2 hours or until the filling has completely cooled. Keep refrigerated.
Notes
  1. *Though I adore the homemade filling, for a quicker dessert you could always use canned raspberry pie filling instead!
Butter, Love, and Cowboys https://www.butterloveandcowboys.com/
No-Bake

Creamy Peanut Butter Pie

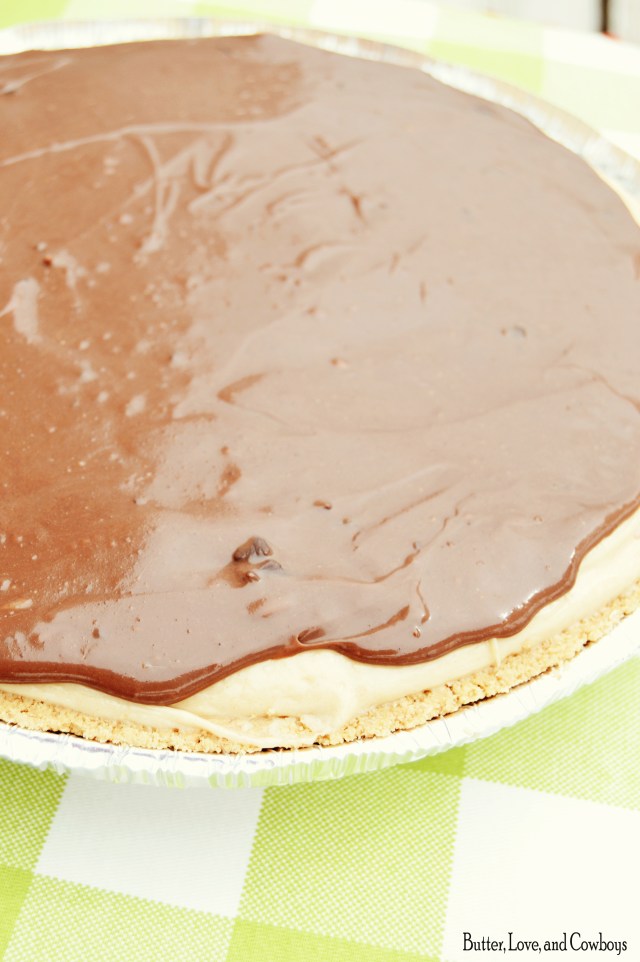
Peanut Butter Pie is one of the BEST recipes to fill a chocolate and peanut butter fix. It is oh so creamy and oh so peanut butter-y, with a touch of chocolate. When I graduated college, my sister brought this pie to my graduation party. I immediately decided it just had to be the best darn Peanut Butter Pie I ever tasted. To this day, nothing has ever topped it. At least not for me.

Peanut Butter Pie from butterloveandcowboys.com

This no-bake treat starts out with a graham cracker crust. I am all about Oreo crusts. I love them. Normally, I would suggest an Oreo crust for any dessert that had to do with chocolate or peanut butter. However, I don’t know what it is about this Peanut Butter Pie, but I just love it with that graham cracker crust. This pie is already perfect, so I just couldn’t bring myself to make it any other way.

Next we have an extremely creamy and smooth peanut butter filling. In my opinion, the filling is what makes this Peanut Butter Pie stand out above the rest. To finish, the chocolate ganache topping completes the pie in a way that nothing else could.

Peanut Butter Pie from butterloveandcowboys.com

Peanut Butter Pie from butterloveandcowboys.com

Peanut Butter Pie from butterloveandcowboys.com

Peanut Butter Pie from butterloveandcowboys.com

Peanut Butter Pie from butterloveandcowboys.com

Peanut Butter Pie is a great dessert for any summer gathering!

Peanut Butter Pie
A smooth and creamy peanut butter pie, topped with just the right amount of chocolate.
Write a review
Print
For the crust
  1. *9 whole graham crackers OR 1 bought 10-inch graham cracker crust
  2. 1/3 cup sugar
  3. 1/2 cup butter, melted
For the peanut butter filling
  1. 1 cup cream
  2. 14 oz cream cheese
  3. 2 cups sugar
  4. 1 1/2 cups peanut butter
  5. 2 teaspoons vanilla
  6. 2 tablespoons butter, melted
For the chocolate ganache
  1. 1 cup milk chocolate chips
  2. 1/3 cup cream
For the crust
  1. 1. If making your own graham cracker crust, crush the graham crackers. Mix the graham cracker crumbs and sugar together. Add the melted butter and combine.
  2. 2. Press into a 9-inch pie plate. Use the bottom of a cup to press it in well. Bake at 350 F for 10 minutes. Let cool.
For the peanut butter filling
  1. 1. Whip the cream until stiff peaks form. Set aside.
  2. 2. Beat cream cheese and sugar well. Add peanut butter and vanilla, then mix. Gradually add the melted butter and combine. Fold the whipped cream into the peanut butter mixture. Do not over-mix. Pour peanut butter filling into your graham cracker crust.
For the chocolate ganache
  1. 1. Heat the cream in the microwave until almost boiling. Pour over chocolate chips. Whisk until well combined. You may need to warm it in the microwave to melt completely.
  2. 2. Spread over the pie and chill until set, about 2-3 hours.
Notes
  1. If you use a bought graham cracker crust, don't use the regular 9-inch size, it has to be the 10-inch size or else it will overflow. The 10-inch size is 9 oz and usually says it makes two extra slices or servings.
Butter, Love, and Cowboys https://www.butterloveandcowboys.com/
No-Bake

Banana Pudding

What a delicious summer treat! Banana Pudding is 100% satisfying and tasty. Not to mention it is super simple and quick to throw together. Thank goodness no oven is required. We reached 100 degrees today. I am dying. We don’t have central air, but we do have a swamp cooler. Bless that thing.

My Cowboy did have to replace the motor in it today, but fortunately it is back up and running, making this summer heat bearable. I had hopes of getting this recipe on the blog for you before July 4th, because it is a fantastic it’s triple digits, your house is full of people, and you do NOT want to turn the oven on kind of dessert. However, last week was spent camping and preparing my house for company. Therefore, Banana Pudding didn’t quite make it on the web in time.

Banana Pudding from butterloveandcowboys.com

While the 4th of July may be past us, hot summer days are not. I hope next time you need a fast, no-bake treat, you will give this Banana Pudding a try. You won’t regret it. There are many recipes out there for Banana Pudding, but this one is as good as it gets! This is Paula Deen’s version. Pretty much anytime Paula Deen has a version of anything, it is my favorite.

Banana Pudding from butterloveandcowboys.com

Banana Pudding from butterloveandcowboys.com

Banana Pudding from butterloveandcowboys.com

Banana Pudding from butterloveandcowboys.com

Banana Pudding from butterloveandcowboys.com

  Now go get your summer on with this summer treat!
Recipe lightly adapted from Paula Deen.

Banana Pudding
Write a review
Print
Ingredients
  1. 1 box (11 oz) vanilla wafers
  2. 6 bananas, sliced
  3. 1 box (5 oz) vanilla pudding
  4. 2 cups milk
  5. 1 package (8 oz) cream cheese
  6. 1 can (14 oz) sweetened condensed milk
  7. 12 oz Cool Whip
Instructions
  1. 1. Set aside 15 wafers. Layer the remaining wafers on the bottom of a 9x13 pan.
  2. 2. Slice the bananas and lay them on top of the wafers. Reserve a few slices for garnish.
  3. 3. Whisk together the vanilla pudding and milk until well combined. Set aside.
  4. 4. Beat the cream cheese until soft. Add the sweetened condensed milk and combine well. Fold in the Cool Whip. Fold in the pudding.
  5. 5. Spread this mixture on top of the wafers and bananas. Roughly crush the remaining wafers and evenly sprinkle on top of the dessert. Garnish with remaining banana slices.
  6. 6. Refrigerate 1 hour before serving. Keep refrigerated.
Butter, Love, and Cowboys https://www.butterloveandcowboys.com/
No-Bake

Heavenly Oreo Dessert

Heavenly Oreo Dessert is one of my personal, most loved dessert recipes. It is one of those things you can just eat, and eat, and eat, and eat, and eat, and eeeeeeeeeeeeeat. I always make it several times in the summer, as it is another trusty no-bake and oh-so-simple recipe. 

It comes straight from Mandy’s Recipe Box. I couldn’t even change a thing, because it is so perfect. When My Cowboy and I were engaged, Mandy lived in the community where my in-law’s live (also where we currently live). My Cowboy’s mama threw a bridal shower for me and asked everyone to bring a recipe to put together in a book for me. Mandy brought a cute little recipe card entitled “Heavenly Oreo Dessert”. 

Heavenly Oreo Dessert from butterloveandcowboys.com

It took me a while to rotate through the recipes I had been given, so I didn’t get around to making this recipe immediately. If I had known then what I know now, I would have placed Heavenly Oreo Dessert as top priority! Mandy explains on her site, there are other titles such as “Chocolate Lasagna” or “Oreo Delight”. However, I completely, totally, absolutely, 125% agree with Mandy, that the title Heavenly Oreo Dessert just fits this recipe best. It just does. 

Heavenly Oreo Dessert from butterloveandcowboys.com

Heavenly Oreo Dessert from butterloveandcowboys.com

Heavenly Oreo Dessert from butterloveandcowboys.com

Heavenly Oreo Dessert from butterloveandcowboys.com

Heavenly Oreo Dessert from butterloveandcowboys.com

Heavenly Oreo Dessert from butterloveandcowboys.com

 
Try it and see for yourself. It is nothing short of heavenly.

Heavenly Oreo Dessert
Write a review
Print
Ingredients
  1. -1 package Oreo's
  2. -1/2 cup butter, melted
  3. -2 packages (3.9 oz each) instant chocolate pudding
  4. -3 1/4 cup milk
  5. -2 (8 oz each) containers Cool Whip
  6. -8 oz cream cheese, soft
  7. -1 cup powdered sugar
Instructions
  1. 1. Crush all Oreo Cookies in a Ziplock bag with a rolling pin. I prefer to do it by hand rather than in a food processor because I LOVE the Oreo's in small chunks for this recipe rather than processed into crumbs. (Look at my photos to further reference the size or chunks I do). Set aside 1/2 cup Oreo chunks for topping (You can crumble these smaller since they are for garnish). Pour the rest of the crumbs into a 9x13 pan and pour melted butter on top. Mix by hand or with a spoon until well combined and press into the pan for the crust.
  2. 2.In a mixing bowl, mix together pudding packages and milk. Whisk until smooth. Place in the fridge.
  3. 3. Beat cream cheese until smooth. Add powdered sugar and mix until combined. Fold in one container of Cool Whip. Spread over the Oreo crust.
  4. 4. Pull pudding out of the fridge and stir. Place on top of the cream cheese layer. Next, spread the second container of Cool Whip and then sprinkle the leftover 1/2 cup of Oreo crumbs on the top.
  5. 5. Refrigerate about thirty minutes.. Keep refrigerated.
Butter, Love, and Cowboys https://www.butterloveandcowboys.com/
No-Bake

Easy Raspberry Sauce

 This Easy Raspberry Sauce is another one of those toppings I can’t help but eat straight from the jar. My Cowboy couldn’t resist it either. Both of us have shovelled many spoonfuls in our mouths. I have been struggling with sauce addiction lately. It all started with Ree Drummond’s caramel sauce I shared with you a couple of months ago. After making that incessantly, I moved on to her hot fudge recipe, my hot fudge recipe, and then, lo and behold, along came this Raspberry Sauce. Oh heavenly day.

Raspberry Sauce from butterloveandcowboys.com

Once a month, all of My Cowboy’s family gets together on Sunday evening for family dinner. Us womenfolk each take turns preparing and hosting the meal. Last month was my month, and for dessert, I decided I wanted to do a cheesecake. I had a serious problem though. Some days I am totally in the mood for fruity cheesecake while others I am in the mood for more of a chocolate-y one. This time, I just couldn’t decide. Cheesecake recipes flooded through my mind. I came to the conclusion that because of my indecisiveness, I would give everyone the option for themselves whether they were feeling fruity or chocolate-y cheesecake. I made a simple vanilla cheesecake, caramel sauce, hot fudge sauce, and this Raspberry Sauce. 

Raspberry Sauce from butterloveandcowboys.com

Another great thing about Raspberry Sauce is that it is so versatile. It was absolutely fabulous on the cheesecake. Next time I bake a vanilla cheesecake, I think I’ll just top the whole thing with a batch of this sauce. You could also drizzle it on ice cream, pancakes/waffles, or even cake!

Raspberry Sauce from butterloveandcowboys.com

See that puppy in the background? Cache definitely wanted some Raspberry Sauce too.

Raspberry Sauce from butterloveandcowboys.com

Raspberry Sauce from butterloveandcowboys.com

Raspberry Sauce from butterloveandcowboys.com

When it came time to eat the cheesecake, I still couldn’t decide which I wanted more- fruity or chocolate-y! On top of that, I had made a pan of Heavenly Oreo Dessert as well. What’s a girl to do? I decided I just couldn’t justify eating two pieces of cheesecake AND a slab of Heavenly Oreo Dessert. So, I cut my piece of cheesecake in half and topped one part with Raspberry Sauce, the other with hot fudge and caramel. It rocked my evening.

Recipe adapted from My Baking Addiction’s Blueberry Sauce

Easy Raspberry Sauce
A quick and easy sauce to drizzle on cheesecake, ice cream, pancakes/waffles, or even cakes!
Write a review
Print
Ingredients
  1. 2 tablespoons cornstarch, mixed with two tablespoons cold water
  2. 2 cups fresh OR frozen raspberries
  3. 1/2 cup water
  4. 3/4 cup sugar
  5. 2 tablespoons lemon juice
  6. 1/2 teaspoon vanilla
Instructions
  1. 1.In a small bowl or a cup, whisk the cornstarch and cold water together.
  2. 2. In a medium sized sauce pan, place raspberries, water, sugar, and lemon juice. Stir frequently as you bring the mixture to a low boil over medium heat. Gradually, stir in the cornstarch/water mixture.
  3. 3. Simmer, covered, for about five minutes or until desired thickness is reached. Add vanilla and remove from the heat. Serve over cheesecake, ice cream, pancakes/waffles, cake, or any dessert you would like.
Notes
  1. Yields about 2 cups
Butter, Love, and Cowboys https://www.butterloveandcowboys.com/
Cookies, No-Bake

Easy No-Bake Cookies

Easy No-Bake Cookies are everything that the title hints and more. These cookies have long been a favorite of both My Cowboy’s and mine. They are often requested when I ask him what sounds good for dessert. With so many recipes out there for this classic treat, it is hard to compete, but I tell you, this is my absolute favorite one! Proportionally, they couldn’t get any better if they tried. The chocolate to peanut butter ratio is simply perfection. 

Dry No-Bake Cookies have always been a bitter disappointment to me. No need to worry about these turning out hard and crusty. If the instructions are closely followed, they will turn out just right…every time. My seven-year-old nephew who lives across the road, you know, that cute little cowboy from my branding posts, has been known to search around my house for them. It makes my heart happy. On the occasions I’ve had to inform him we are out of No-Bake Cookies, he requests that I make them again.

No-Bake Cookies from butterloveandcowboys.com

After photographing these babies, I decided it’s really hard to make No-Bake Cookies appealing in photos. In all honesty, the are not the prettiest treat, but I sure tried my best to make them appear appetizing enough to tempt you 🙂

No-Bake Cookies from butterloveandcowboys.com

I’m a strong advocate of whole grains. At my house, we strive for the majority of our diet to be filled with them. When it comes to dessert making however, I totally loosen the reins. While a lot of things can, some things just can’t be replaced completely with whole grain flours and taste the same. Although No-Bake Cookies still have plenty of sugar, they also have great things like peanut butter and oats. Whole grain for the win! 

No-Bake Cookies from butterloveandcowboys.com

No-Bake Cookies from butterloveandcowboys.com

No-Bake Cookies from butterloveandcowboys.com

No-Bake Cookies from butterloveandcowboys.com

No-Bake Cookies from butterloveandcowboys.com

No-Bake Cookies from butterloveandcowboys.com

It’s getting to the point here that it’s just too hot to turn on the oven more than is absolutely necessary. The ease and No-Baked-ness of this recipe make them the perfect treat for this time of year!

Easy No-Bake Cookies
A simple and fast no-bake treat, with the perfect proportions of chocolate and peanut butter!
Write a review
Print
Ingredients
  1. -4 tablespoons cocoa powder
  2. -2 cups sugar
  3. -1/2 cup butter
  4. -1/2 cup milk
  5. -1 cup peanut butter
  6. -2 teaspoons vanilla
  7. -3 cups old fashioned oats
Instructions
  1. In a large saucepan, bring cocoa, sugar, butter, and milk to a boil. Boil for one minute, then stir in the peanut butter, vanilla, and oats. Drop by spoonfuls onto parchment paper or a greased cookie sheet. Let sit until cooled.
Butter, Love, and Cowboys https://www.butterloveandcowboys.com/
No-Bake

Oreo Peanut Butter Apple Salad

This Oreo Peanut Butter Apple Salad is one of my new favorites! In my opinion, there is nothing that has the ability to spice up a family dinner quite like a fruit or jello salad. This would be a great addition to the table for Mother’s Day this Sunday. A lot of these types of salads are pretty much dessert, but I just pretend they’re not to justify eating dessert after the meal as well 🙂 The way I see it, if you eat enough, you will totally get a serving of apples. 

My adoration of the combo of Oreo’s and peanut butter came around the time the Lindsay Lohan version of “The Parent Trap” came out. It is still one of the most loved movies of my childhood! I was only about six or seven when my older sisters and I rented it on the Dish. We made a VHS recording of it and I watched that movie over and over and over and over and over. For years.

Remember the part where Hallie teaches Annie to dip Oreo’s in peanut butter? I started doing it too and have loved it ever since! I give that movie partial credit for the fact that Peanut Butter Oreo’s are now my favorite rendition of the cookie. I have been wanting to try incorporating peanut butter into a fruit salad for a while. So when I found this gem of a recipe over at Something Swanky, with peanut butter AND Oreo’s, I knew I would love it. She wrote it as a variation on Snickers Apple Salad- which is fabulous as well!

Oreo Peanut Butter Apple Salad from butterloveandcowboys.com

Oreo Peanut Butter Apple Salad from butterloveandcowboys.com

Oreo Peanut Butter Apple Salad from butterloveandcowboys.com

Oreo Peanut Butter Apple Salad from butterloveandcowboys.com

Oreo Peanut Butter Apple Salad from butterloveandcowboys.com

With only My Cowboy and I in our household, I don’t make salads like these very often because it is so hard for the two of us to get through an entire batch. So they are kind of a special occasion type of deal for us. I love to make them when I get the chance to feed a group of people that can help us eat it all. My sister and her family visited us a while back. This meant I had enough people to help us power through this delicious Oreo Peanut Butter Apple Salad! Not that it was a very difficult task by any means. I think My Cowboy and I almost could have eaten this salad entirely on our own 🙂

Like my recipes and ramblings? Don’t forget to subscribe and never miss an update!

Oreo Peanut Butter Apple Salad
Write a review
Print
Ingredients
  1. 3.75 oz vanilla pudding mix
  2. 1 1/4 cup milk
  3. 1/2 cup peanut butter
  4. 8 oz Cool Whip
  5. 4 apples
  6. 20-25 Oreo's, chunked
Instructions
  1. In a large bowl, whisk the milk and pudding mix. Let thicken a couple minutes. Place peanut butter in a small, microwave-safe dish and microwave about twenty seconds, until melted, but not hot. Mix into the pudding. Fold in Cool Whip. Cut the apples into chunks and incorporate in the pudding mixture. If not serving immediately, place in the fridge for 1-2 hours. This isn't necessary, but will give time for the flavors to combine. The Oreo's get mushy pretty fast, so I prefer to wait to fold them in until right before I serve the salad. When you are ready to add the Oreo's, break them into large chunks and add them to the salad! Drizzle with hot fudge, or Hershey's Syrup and melted peanut butter if desired. I also like to garnish it with a few extra Oreo's. Enjoy!
Notes
  1. Recipe lightly adapted from Something Swanky.
Butter, Love, and Cowboys https://www.butterloveandcowboys.com/
Brownies and Bars, No-Bake

Peanut Butter Bars

There are a million different recipes out there for “Lunch Lady” Peanut Butter Bars. Well, these are the Peanut Butter Bars MY lunch lady made me from the time I was in third grade all the way up to my senior year of high school. Not only were these my absolute FAVORITE treat the school cooks made, but they were always served with my most loved main dish the school made as well-meatballs on steamed rice, dinner roll, and green beans! 

As if I wasn’t satisfied enough after the meal itself, I got to top it all off with these bars! Another thing about my school cooks- they were so generous. If they knew they were serving you your favorite meal, by-golly, they made sure to serve you up a good pile of it! Once you reached high school age, any dessert leftovers were free game after everybody had made it through the lunch line. My meatballs on rice was always accompanied by at least two, sometimes three or more, of these Peanut Butter Bars. I often went up for seconds or thirds! What a gluttonous teenager I was. Even now, it is hard for me to contain and ration myself if a pan of these babies are near.


Peanut Butter Bars from butterloveandcowboys.com

Another great thing about these bars is they are no-bake. We are coming up on summer where the days are too hot to want to turn on the oven. A lot of Peanut Butter Bars are of the baked variety. Until I was about eleven or twelve, I didn’t even know that there was such a thing as a baked Peanut Butter Bar. It was a bitter disappointment to me the first time I thought I was getting a Peanut Butter Bar just like the ones at my school, to see the hot pan being pulled out of the oven!

I have totally warmed up to baked Peanut Butter Bars, but when I think of a traditional Peanut Butter Bar, these are still the exact ones that I think of, crave, desire, and need-or whatever you wanna call it. Need probably fits the description best.

Peanut Butter Bars from butterloveandcowboys.com

The peanut butter filling in these bars- oh how I love it! My school topped these off with a homemade chocolate frosting, but I will use melted chocolate for the topping as well. 

Peanut Butter Bars from butterloveandcowboys.com

Peanut Butter Bars from butterloveandcowboys.com

Peanut Butter Bars from butterloveandcowboys.com


I promise these will make your school year. They sure always made mine.

Like my recipes and ramblings? Then don’t forget to subscribe!

Peanut Butter Bars
A creamy no-bake Peanut Butter Bar that will satisfy your sweet tooth every time.
Write a review
Print
Ingredients
  1. 2 cups peanut butter
  2. 3 cups powdered sugar
  3. 2 cups Rice Krispie's Cereal
  4. 1/2 cup butter, soft
*Chocolate Frosting
  1. 1/2 cup butter, soft
  2. 1/4 cup cocoa powder
  3. 2-3 cups powdered sugar
  4. 1/4 cup milk, for consistency
Instructions
  1. Mix peanut butter and butter until smooth and creamy. Add powdered sugar, one cup at a time until fully incorporated. Combine well. Fold in Rice Krispie's. Press into a greased 9x13 pan.
Chocolate Frosting
  1. Beat butter and cocoa powder until smooth. Add powdered sugar, 1 cup at a time, mixing well in between each addition. Add milk and beat until smooth and creamy, you may use more or less than the listed 1/4 cup. I like to beat my frosting at least 2-3 minutes after every ingredient is added, until it is very smooth, creamy, and slightly whipped. Spread over top of peanut butter layer.
  2. You probably won't need all of the frosting. Generally I like desserts pretty heavily frosted, but it really doesn't take much to make these great! Refrigerate any unused frosting. It's always good to have a little extra frosting on hand 🙂
Notes
  1. *I prefer the chocolate frosting, but you can also melt 2 cups of chocolate chips with a little shortening and use that as the topping instead of the chocolate buttercream. They taste great either way!
Butter, Love, and Cowboys https://www.butterloveandcowboys.com/